
Cameras automatically record the Date Created in each image captured, but if the date is incorrect, Mylio Photos makes it simple to make modifications. You can even include non-specific fuzzy dates such as a Season, Year, Decade, or Undated. There are several reasons why a capture date may need to be adjusted. Here are a few examples:
- The image was scanned from a print. Scanned media records the image’s scanned date rather than the original capture date.
- The camera’s internal date and time setting was incorrect.
- Pictures were captured in another time zone, which caused the time stamp of a series of images to be off by one or more hours.
- Select a photo or series of photos.
- Click the info icon
![]() at the top of the right sidebar to reveal the right panel and access the Info Panel. then scroll down to the Date Created section.
at the top of the right sidebar to reveal the right panel and access the Info Panel. then scroll down to the Date Created section. - Manually edit the Date Created field by typing your changes or click the ellipsis icon
![]() and choose one of the following options:
and choose one of the following options:
- Shift
-
The Shift option allows you to adjust the time and date by a set amount. This is particularly helpful for correcting time-zone issues. Click the
![]() or
or ![]() buttons to move the Date Created by Days, Hours, Minutes, Seconds, or Subseconds. Alternatively, enter a positive or negative number (e.g.,
buttons to move the Date Created by Days, Hours, Minutes, Seconds, or Subseconds. Alternatively, enter a positive or negative number (e.g., -1or1) into the text fields. When you’re done, click the Shift button. - Timestamp
-
The Timestamp option lets you add or adjust the exact time and date for media. Select the Year, Month, Date, Hour, Minute, and Second you’d like to assign, then click the Save button.
- Date Range
-
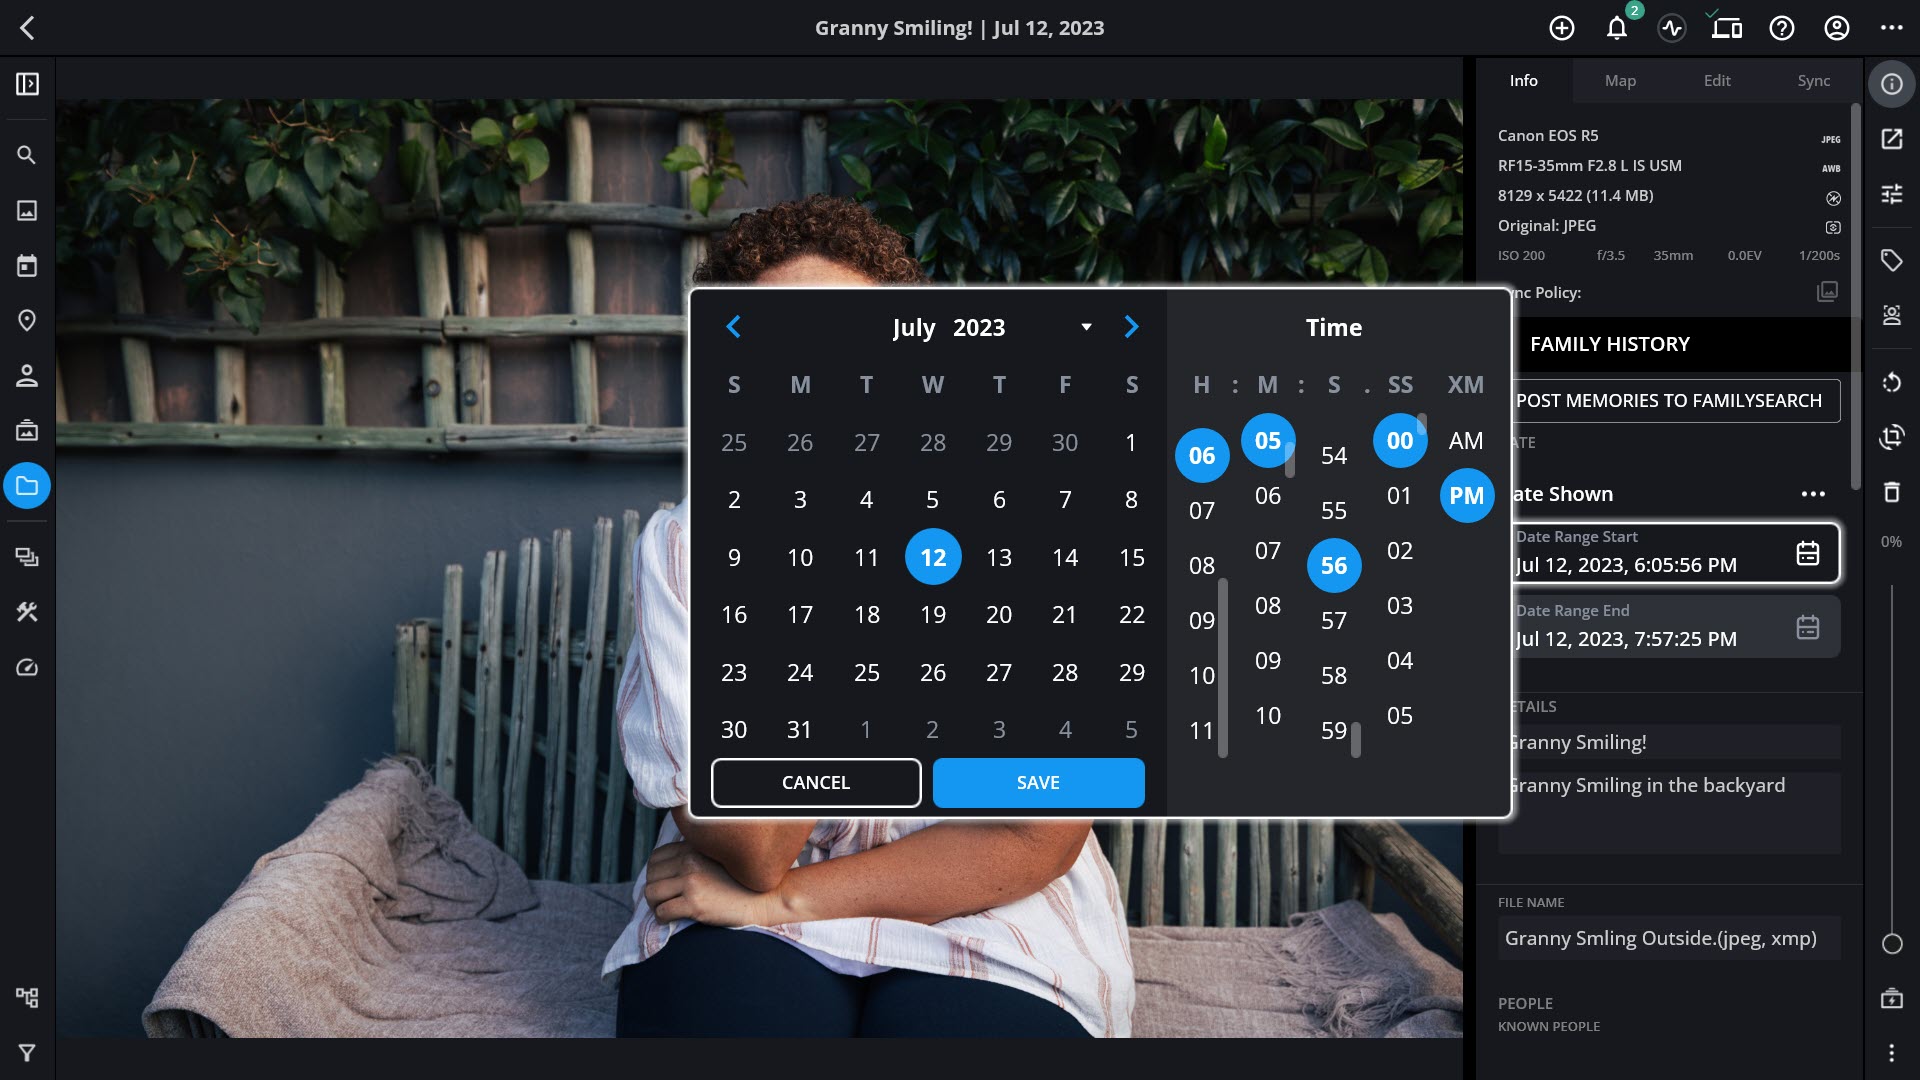
Setting a custom Date Range allows you to enter an estimated time frame for one or more photos and videos. This works well for images where you know the photo was taken between two days but are unsure about the specific date. Select the Year, Month, Date, Hour, Minute, and Second for the Date Range Start, then click the Save button. Repeat the process for the Date Range End.
- All Day
-
Choosing All Day lets you select a specific date without adding a particular time. This works well for images where you know the date the photo was captured but are unsure of the time. Select the Year, Month, and Date, then click the Save button.
- Month & Year
-
Selecting Month & Year allows you to set a particular month and year without specifying a date or time. This works well for photos and videos where you know the year and month they were captured but are unsure of the specific date and time. Select the Year and Month, then click the Save button.
- Season & Year
-
Choosing Season & Year lets you pick a season (Winter, Spring, Summer, or Fall) and year without specifying a month, date, or time. By default, Mylio Photos’ seasons are set for the Northern Hemisphere. If you live in the Southern Hemisphere or wish to customize the dates for seasons, you can do so in Mylio Photos’ Settings. The first time you choose Season & Year, you’ll be prompted to open your Settings and set the start dates for each season. Select the Season and Year, then click the Save button.
Customize the start dates for Seasons
- Click the ellipsis icon
![]() in the top app bar to access the More menu and choose Settings and choose LifeCalendar.
in the top app bar to access the More menu and choose Settings and choose LifeCalendar. - Select Seasons, then enter your preferred dates for the start of each season. When you’re done, click the Save button and close the Settings dialog.
- Click the ellipsis icon
- Year
-
Selecting Year lets you choose a year without specifying a month, date, or time. This is a good option when you know the year an image was captured but are unsure of the exact date or time. Select the Year, then click the Save button.
- Decade
-
Choosing Decade lets you choose a decade without specifying a year, month, date, or time. This is a good option when you know the approximate era in which a photo was captured but are unsure of the specific year or date. Select the Decade, then click the Save button
- Undated
-
Marking images as Undated removes all date and time metadata from the selected image. When working with older digital photos or scanned images with incorrect capture dates, you may want to mark these photos as Undated rather than setting a specific date or date range. You can always come back to these images to add dates and times in the future. Select Undated, then click the Save button.
Locating Undated photos
- Click the Calendar icon
![]() in the left sidebar.
in the left sidebar. - Scroll to the top of the calendar to locate the Undated container.
- Click on Undated to show all photos and videos marked as Undated.
- Click the Calendar icon
*TIP: An image with a fuzzy (non-specific) date will have an annotation ![]() that indicates the file is dated with a range of dates. You can toggle this annotation off by clicking on the ellipsis icon
that indicates the file is dated with a range of dates. You can toggle this annotation off by clicking on the ellipsis icon ![]() in the top app bar to access the More menu and selecting Annotation
in the top app bar to access the More menu and selecting Annotation
Post your comment on this topic.